By using this website, you agree to our use of cookies (needed to provide our website’s features) and our Terms of Use.
By: Andrew Forrest - December 2023
In this comprehensive guide, we'll unravel the art of lacing techniques, revealing how minor adjustments can yield substantial improvements in performance, comfort and support during outdoor adventures.
Have you ever considered the impact of something seemingly trivial as how you lace up your walking boots on your overall comfort and hiking experience? It's a question worth exploring as we delve into the intricacies of 'how to lace hiking boots' techniques.
Bid farewell to blisters, pressure points, and discomfort as you gain insights into optimising your lacing strategy for various terrains and diverse foot shapes. Join us on this journey of discovery, where the seemingly simple act of lacing becomes a key element in enhancing your walking experience.
While this article is about lacing hiking boots, the same techniques work just as well on running, trail, fell, and hiking shoes.
You may never have thought about how you tie hiking boots, as many people lace them like their day-to-day shoes or trainers, using the technique they learnt as a toddler. But, with so many factors to consider, such as foot shape, terrain, and personal preferences, it's important to understand the different lacing techniques and their benefits.
You spend a lot of money choosing your hiking boots and socks, so to get the best out of them, you need the correct insoles and tie your laces to suit. The right combination of hiking boots, socks, insoles, and lacing patterns is key to your feet being stable and comfortable in your walking boots or shoes.
These different techniques will enhance the fit and performance of your hiking boots and help prevent common issues such as blisters and pressure points. Whilst laces can fix specific problems, laces are just laces; they are not a pair of magic strings - if your hiking boots are a wrong fit to start with, it is very unlikely they will fix that.
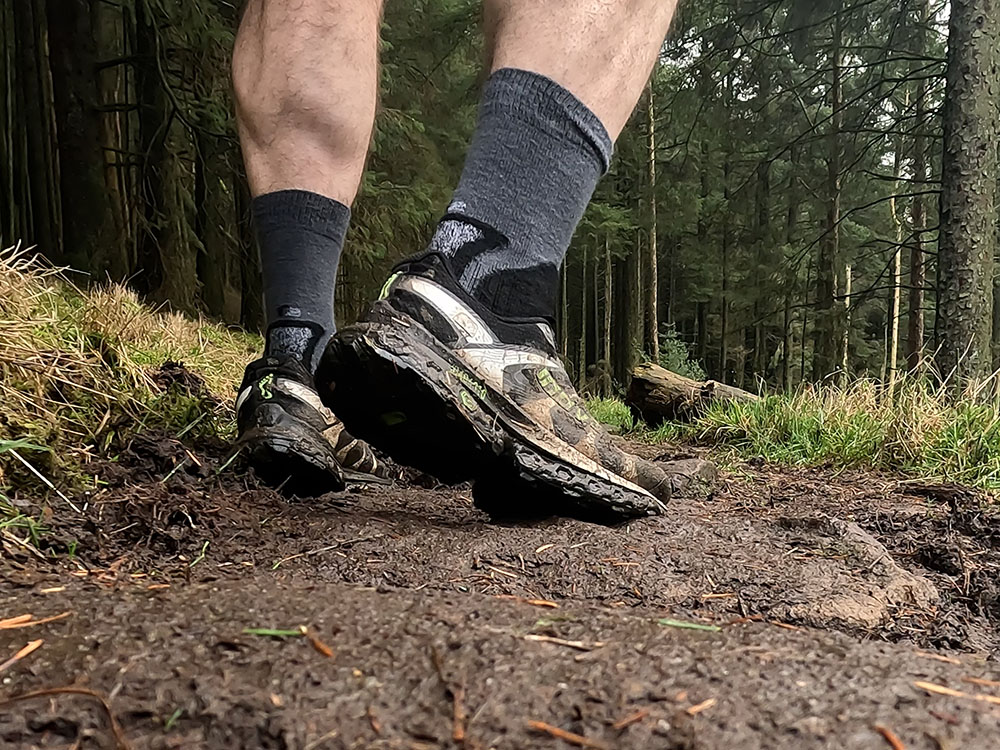
I've shown the techniques below on my leather hiking boots so that the laces stand out clearly. The flexibility or softness of the top of the boot or shoe greatly impacts how well the different lacing techniques work.
For most of the lacing techniques below, I have found the lacing methods work best on running shoes, then ordinary casual shoes, then fell and trail shoes, then walking or hiking shoes, then synthetic hiking boots and then have the least effect on leather walking boots. This is because leather boots are generally sturdier and more difficult to manipulate.
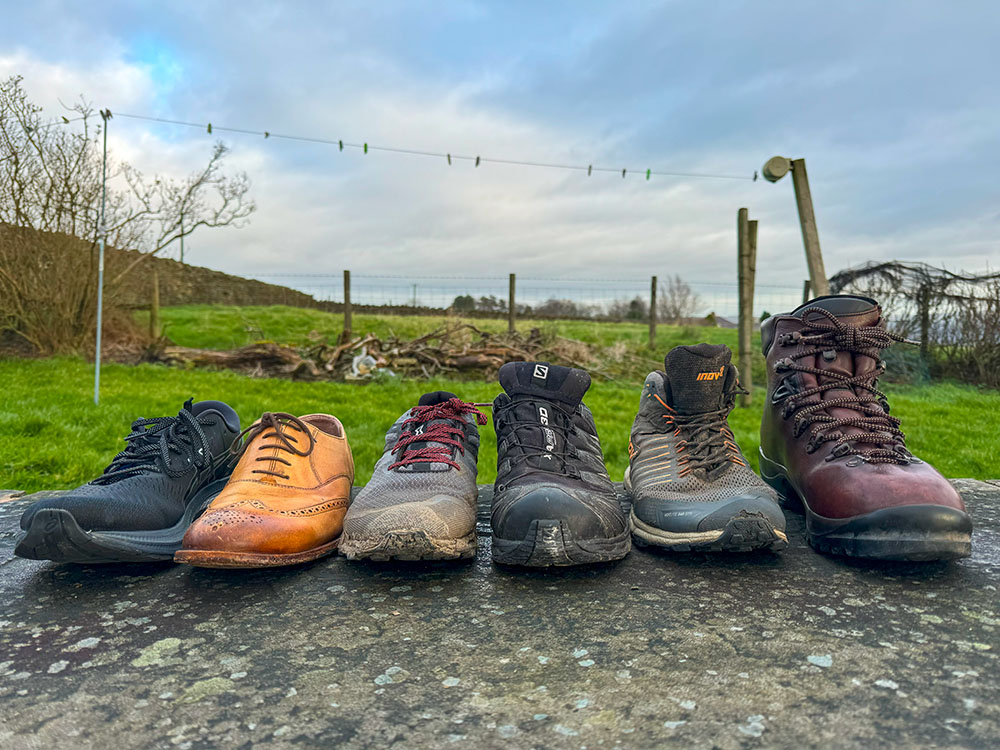
Effectiveness of lacing techniques on various shoe types from left to right - running shoes, casual shoes, trail shoes, hiking shoes, synthetic hiking boots and leather hiking boots
As I walk a lot in my trail shoes and hiking shoes, experimenting with different lacing techniques and insoles helps with the stability and comfort of the shoe.
Blisters are a common issue hikers face, often caused by friction and pressure points in the boots. Preventing blisters is much easier than treating them. While there are many tips for preventing and treating blisters, employing specific lacing techniques can help reduce the risk of developing blisters.
In addition to using proper lacing techniques, maintaining good foot care during hikes can also help prevent blisters. This includes wearing breathable, moisture-wicking socks and taking breaks to air out your feet if needed.
Besides lacing, cleaning and waterproofing your boots will help keep your feet dry, thus eliminating one of the causes of blisters.
Excessive pressure can cause discomfort and may lead to blisters if left unaddressed. Adjusting your lacing on your walking boots to alleviate pressure points and hot spots can lead to a more comfortable hiking experience.
Experimenting with a different lacing system can help you find the perfect balance between support and comfort.
No two feet are exactly alike, so it's important to customise your lacing techniques to accommodate your unique foot shape and lace walking boots to avoid blisters and hot spots.
I suffer from fallen arches, and I have one foot that is worse than the other, where my right one needs more support than my left, so I have many years of experience in getting the insole and lacing technique correct in my boots to help me have a pain-free walk.
Ensuring you have the right insoles and customising your lacing can help you achieve a comfortable and secure fit for each foot, ensuring that your boots feel like they were made just for you.
Understanding your foot shape and applying appropriate lacing techniques can optimise your hiking boots' fit, support, and comfort. This personalised approach to lacing will enhance your hiking experience and help prevent common foot issues, such as blisters, pressure points, and discomfort.
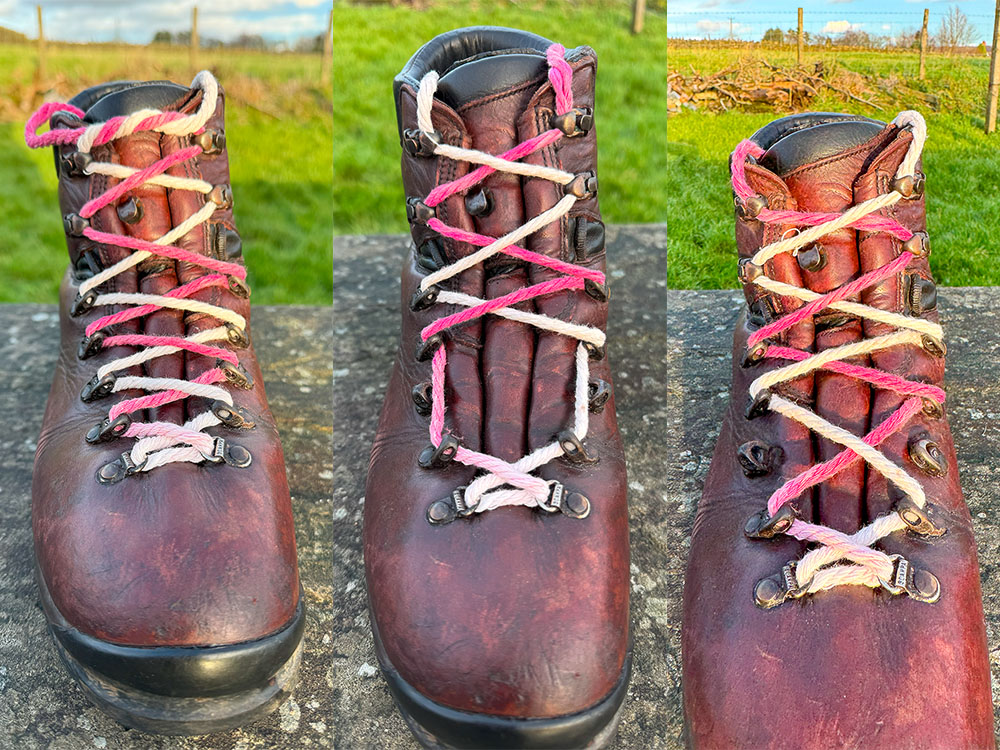
A picture's worth a thousand words, or so the saying goes, but it is when trying to understand how to tie laces and knots. So, I've included photographs below of all the methods used, and I have dyed half my boot laces a different colour, so it's easier to see the lacing method used in the step-by-step directions below.
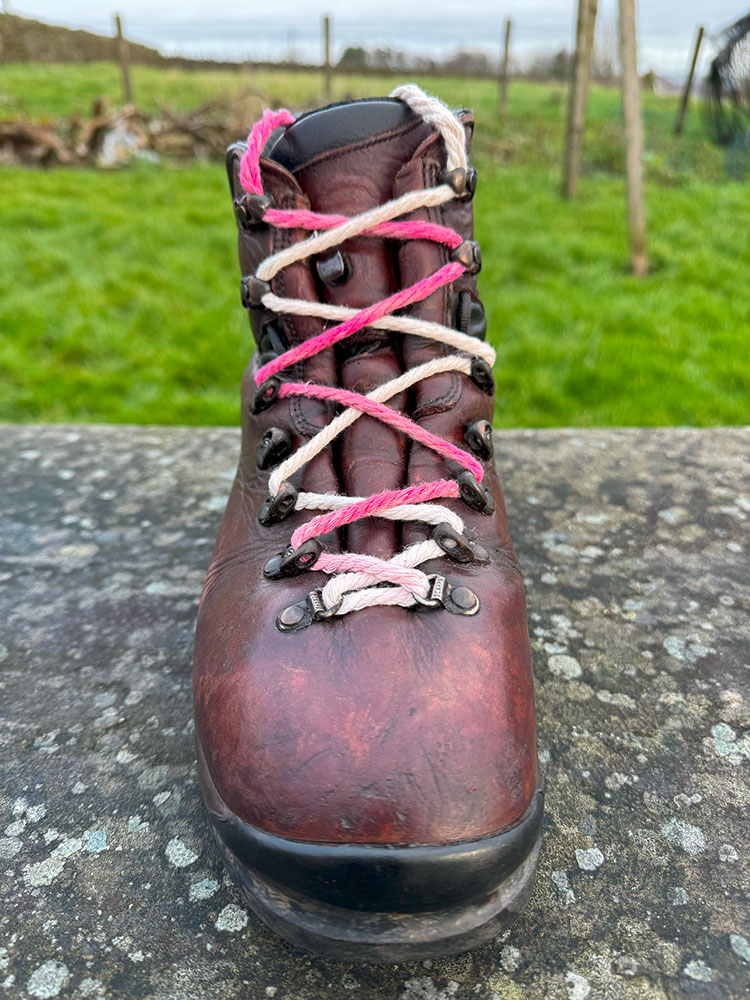
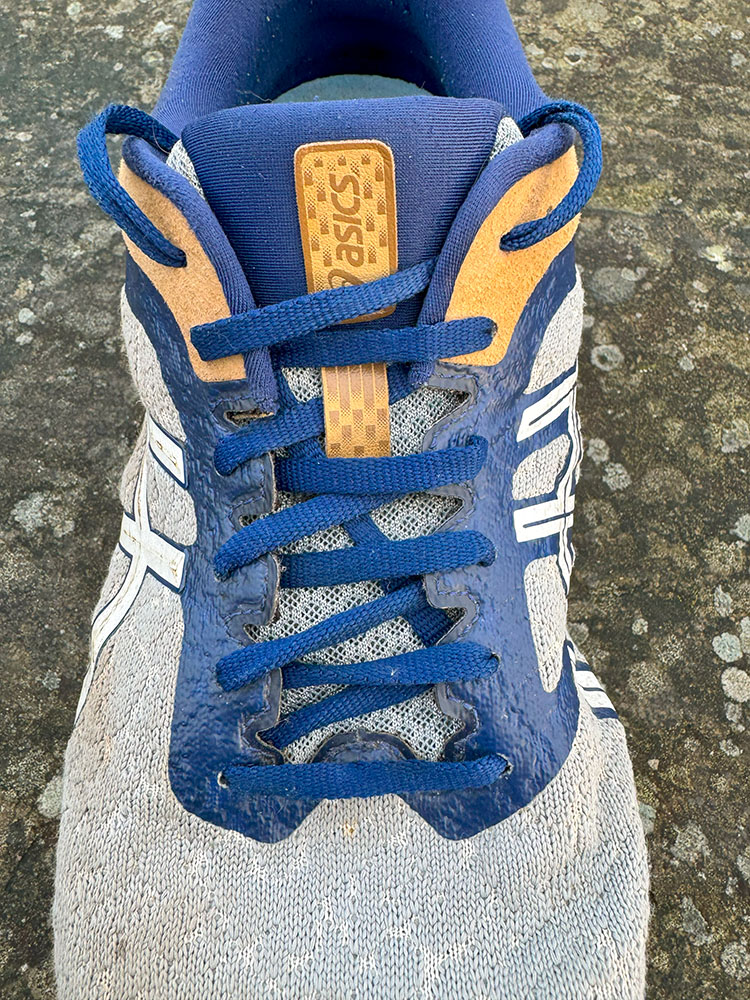
The surgeon's knot is mentioned a lot below. The knot most people use daily is the overhand knot, where you cross one lace over the other, loop it underneath the 'X' you have just made and pull the ends to tighten before tying off.
The surgeon's knot is basically the same but made more secure by looping the lace under one more time before tying it off, creating more friction between the laces and, thus, more tension. As I said, even the simple ones are easier to 'see' in a picture.
Surgeon's knot lacing on a hiking boot
There are many techniques for tying laces to assist with narrow feet, wide feet, high arches, heel slippage, sore toes, wide forefoot, etc. Some methods are very similar, so it is worth experimenting and combining them until you find your perfect fit that enhances stability and comfort whilst hiking.
If you tie hiking boots in the normal way, you use all the eyelets, but many of these techniques work by missing certain eyelets and not using all the lace hooks.
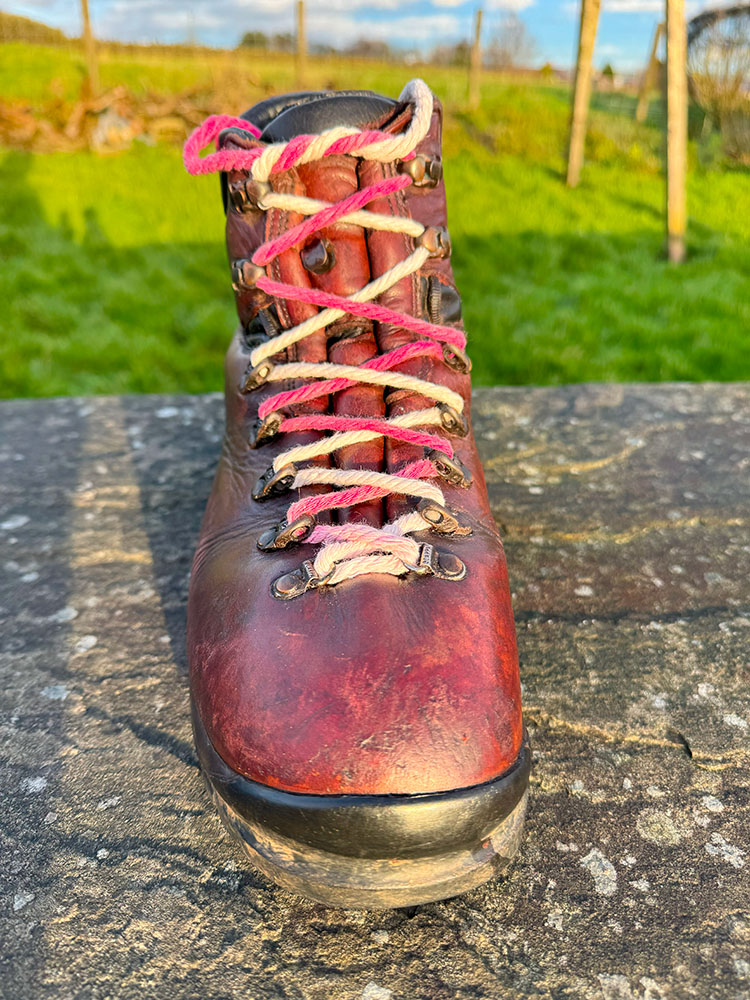
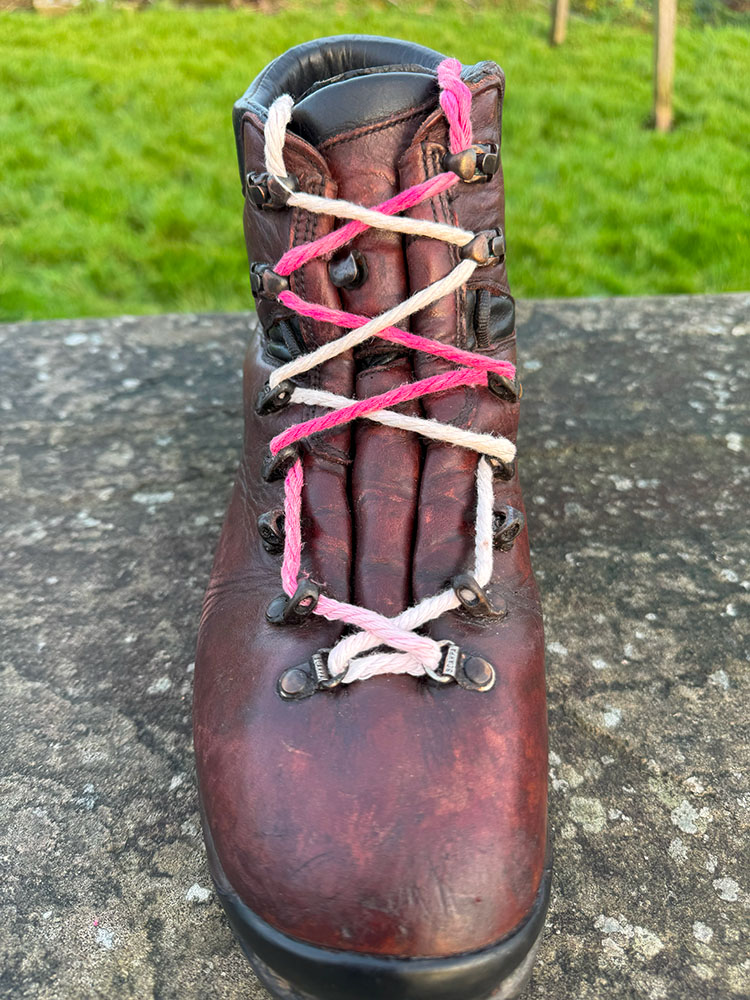
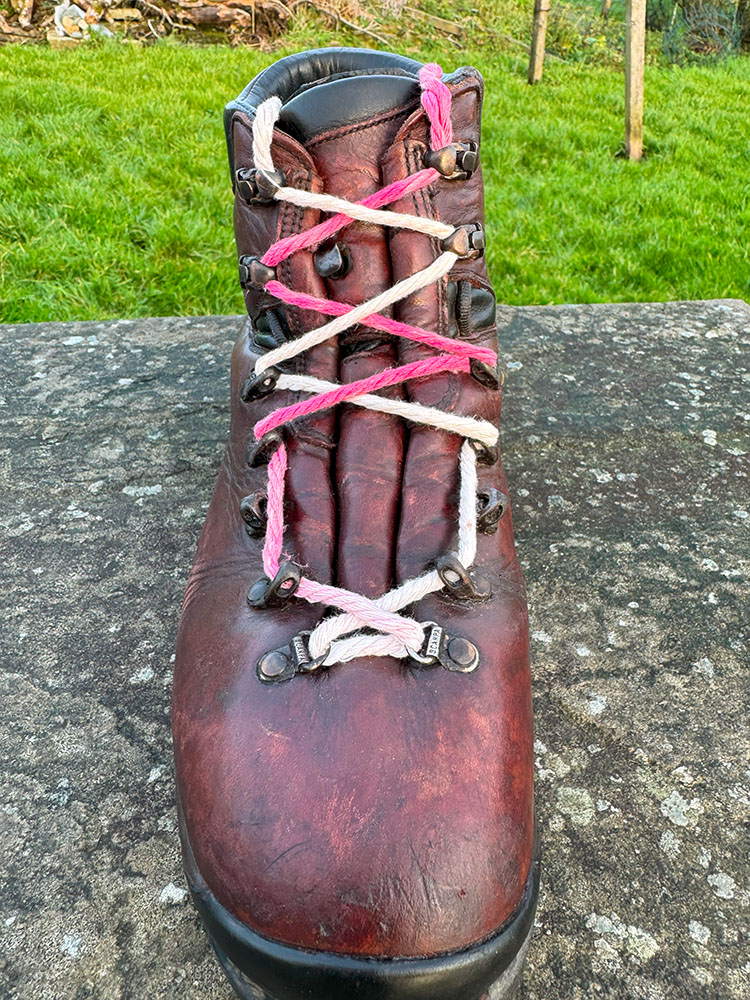
The criss-cross method is the traditional and timeless lacing technique that most of us are familiar with and is very often how boots and shoes are already laced when you buy them.
The laces are interwoven, creating an 'X' pattern and tied in a bow knot at the top of the boot. This method offers a secure and comfortable fit for most hikers.
If the criss-cross lacing technique works for you, make it more secure by pulling the laces tight and finishing it with a surgeon's knot.
Criss-cross lacing on a hiking boot
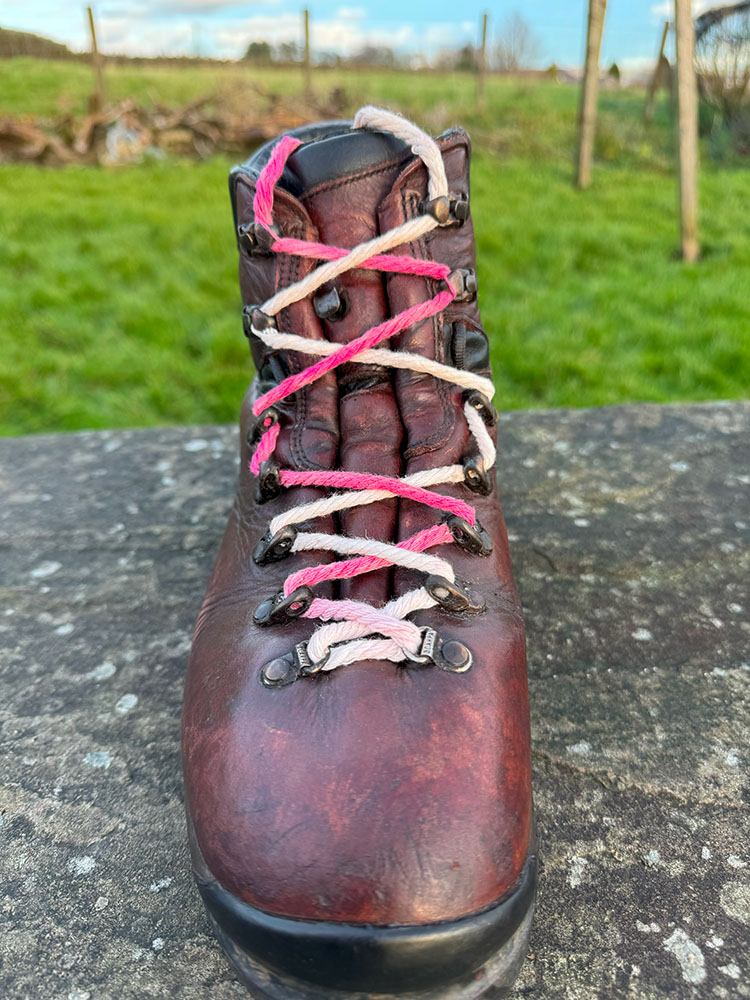
Heel-securing or heel lock knots are crucial in providing heel stability, keeping the foot securely at the back of the boot and preventing forward movement of the foot in the boot, especially during steep descents. They can also help people with narrow feet.
When your heel slips excessively, you likely have too much volume at the top of your boot or shoe. A sign of this is often excessive wear on the heel of your shoes or boots and the accompanying heel blisters.
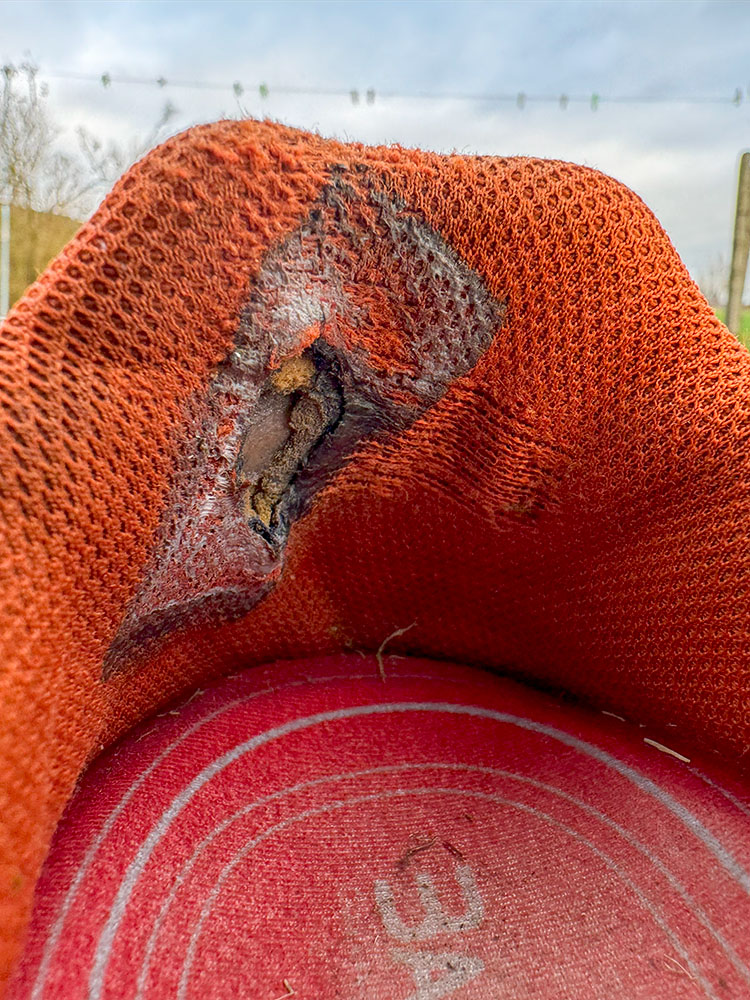
Worn away heel on fell shoes - the hole was fixed by gaffer tape!
To tie a heel-securing or heel lock knot, lace the boots up to the next to the top hooks, then pull the boot laces straight up through the top hooks before crossing the laces and passing them behind the vertical lace joining the two top hooks together, and then tie off. This heel lock knot creates a window at the top of the boot and helps secure the heel.
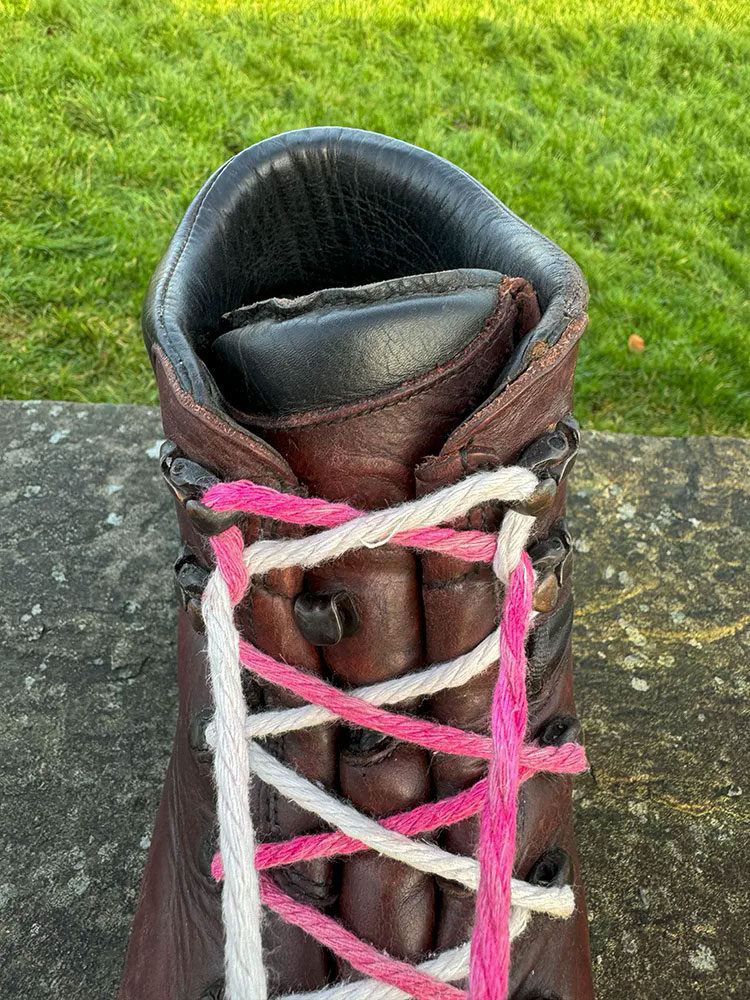
Heel-securing or heel lock lacing on a hiking boot
To make even this heel lock technique more secure, you can 'tie-off' the boots just below the top two sets of lace hooks by using a surgeon's knot before lacing the last two sets of lacing hooks as set out above.
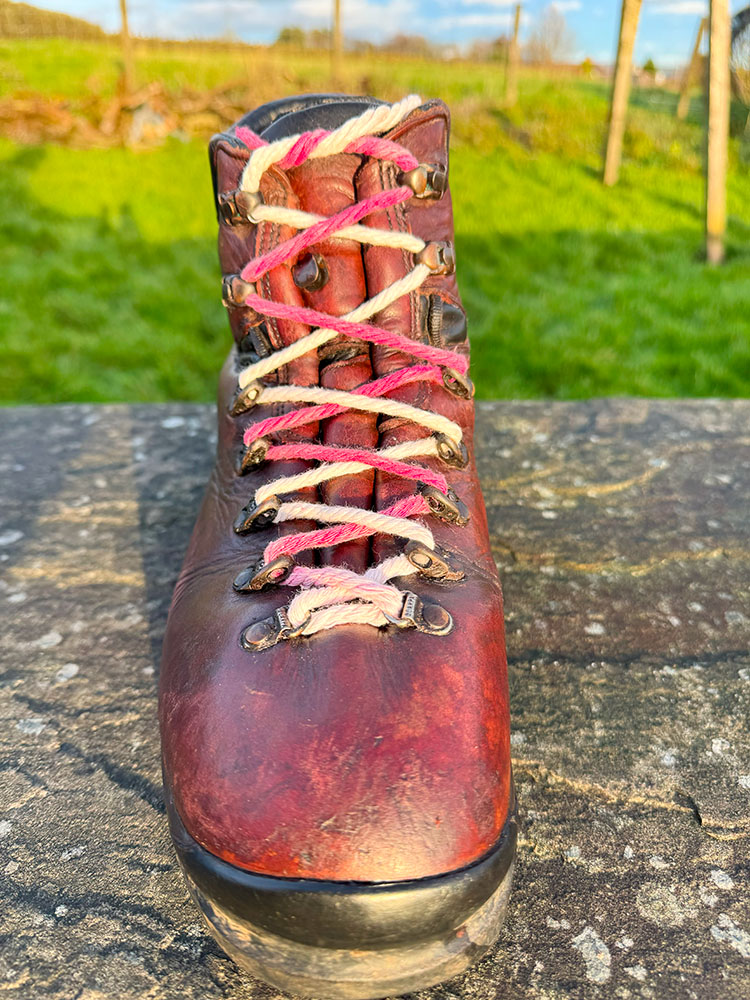
If you feel soreness on top of your foot, then try window lacing. Window lacing, sometimes known as box lacing, is where you effectively leave a 'window' on the lacing pattern of your boots. If you tie hiking boots in the usual way, you use all the eyelets, but many of these techniques work by missing certain eyelets and not using all the lace hooks.
Undo your boot laces to just below wherever the pressure point is. Then, rather than criss-crossing the laces over the sore area, go straight up to the next hook and start the criss-crossing of the laces upwards. This creates a window in your boot or shoe.
Window lacing on a hiking boot to relieve pressure on top of a foot
If your feet don't feel quite as secure in your boots, tie off with a surgeon's knot before creating the window, and then again just above the window, use a surgeon's knot, which will provide a better hold.
You may need more room in your boots if the whole of your feet are wide. To create that room, you can miss out on sets of eyelets. You unlace the boot and then re-lace it in a criss-cross pattern but miss out on a set of eyelets.
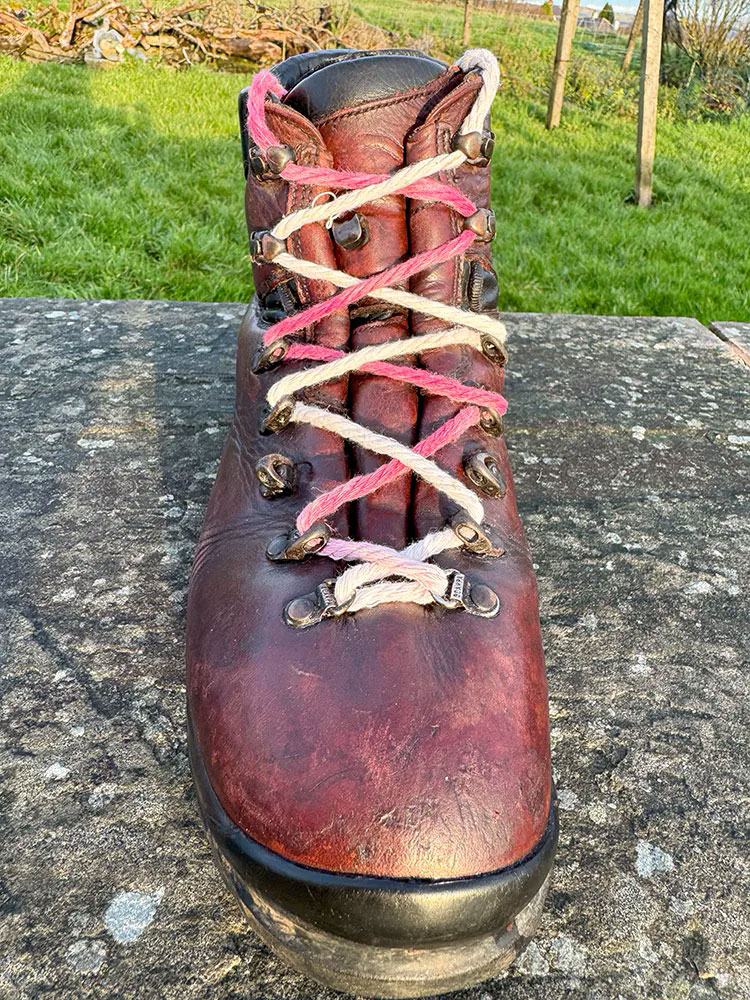
Lacing for wide feet on a hiking boot
If you have very wide feet, then miss out on another set of eyelets further up the boot, alternating the gaps.
Again, if your feet don't feel quite as secure, tie off with a surgeon's knot before missing out a set of eyelets in your boot.
To lace for narrow or low-volume feet, undo your boot laces, re-lace starting with a normal criss-cross, skipping a lace hook, and then continue lacing them in a criss-cross pattern for the rest of the shoe. Then, tie off the boot as usual with a surgeon's knot.
You can also do the same as above and omit more criss-crosses if you have at least three criss-crosses and always finish with a knot. Friends with narrow feet say this method works better in running, fell, and hiking shoes than hiking boots, but it is always worth trying.
Another way, sometimes described as the knotted lacing method, uses a traditional criss-cross pattern but locks off the laces after eyelets 2, 3, or 4 with a hiking boots surgeon's knot to lock down the front of the boot. Locking here effectively creates constant tension below the knot. Try which eyelet works best for you.
Lacing for narrow feet
The heel-lock lacing technique also helps pull the boot tighter around the top of the foot.
Whilst not boot lacing, if the insole in your shoes is thin, you could replace it with another thicker insole in your hiking boot that creates less spare volume in your hiking boot and more cushioning in the boot for your foot to move around. It's often a good idea to replace the insole that comes with your boot with an orthotic insole that provides you with greater comfort and support.
You can also experiment with wearing thicker or two pairs of socks in your boot, but both are not great for summer walking as they can cause your feet to overheat.
If you have a high arch, to avoid causing excessive pressure, you can lace to alleviate the pressure in the middle of the foot. Lace your boots normally from the bottom, starting with a criss-cross. Instead of a criss-cross, go straight up the sides to the next eyelets in the middle section of the boots and then continue lacing in a criss-cross pattern, creating a window.
Window lacing on a hiking boot for high arches
Whilst the photograph above is for high arches, to make the lacing pattern suitable for wide forefeet, start the window from the bottom set of eyelets, so move the window one eyelet down.
If you have a high midfoot, you need to create less pressure around that area. So again, criss-cross the laces until the midfoot area, and then make another window by missing one or two of the eyelets to create window lacing over that spot.
Lacing on a hiking boot for people with a high midfoot
If you often suffer from black toenails or sore toes whilst walking, you can try a couple of additional toe relief lacing methods to create more room in the toe box of your boot or shoe.
The first is simply by creating more space around the toes in the toe box by missing out on the bottom eyelets. Just miss the bottom eyelets and re-lace as normal, or use one of the other boot-lacing techniques.
Toe relief lacing - missing out the bottom eyelets
The second way of toe relief lacing is by unlacing your boots or shoes and then threading through the lace around the bottom eyelets. Then, pull one side through by about 4-5 inches, more for boots with more eyelets and less for running shoes with fewer eyelets.
The more extended lace then goes through the first eyelet in your boots and then on through each eyelet/lace hook, criss-crossing to reach the next eyelet above it, going horizontal so that each eyelet is used - almost creating a spiralling helix effect with that side of the lace.
The shorter side goes straight from the bottom to the top eyelet, the idea being that when you pull your laces at the top to tie them, the shorter lace raises the front of the shoe a little, creating more space in the toe box for your toes.
Lacing for toe relief - helix lacing and single lace from bottom to top
If your toes are sore or you have black toenails, it can also be a sign that your feet aren't being held firmly enough around your heel and are sliding forward, with your toes hitting the front of your boot. This can be alleviated if you lace your boots using the heel-lock method above.
If you have wide feet or high insteps (the top part of your foot), adjusting the lacing in your hiking boots can help alleviate pressure points and provide a more comfortable fit. One effective technique is known as window lacing or box lacing, whereby 'windows' are created in the boot lacing pattern. This window lacing allows for more room and reduces pressure on the top of the foot.
One thing I often do is combine boot-lacing techniques.
I have reasonably wide feet, so I often lace my boots as above for wide feet. But, I sometimes suffer from heel slippage, so I combine the wide feet lacing with the heel-lock lacing further up the boot and then finish with a surgeon's knot before I tie off. This ensures my heel stays firmly at the back of the boot, giving me more space further forward.
The combinations are endless - it is just a case of experimenting to see what works best for you.
As you hike, you might find that your laces become loose or that you need to adjust them for swollen feet.
Loose boot laces can lead to instability and discomfort during a hike. To tighten loose laces, simply undo the knot you tied them off with and pull the laces tight again. I like to work up from the bottom, pulling the slack between eyelets and a firm pull before securing it with a surgeon’s knot and then tying it off again.
Use the above techniques to adjust your laces if you feel any hot spots.
When tightening your boot laces, ensure they are firm but not too tight. I ensure I can fit two fingers between the bootlaces and my foot. This provides the optimal balance of support and comfort throughout my hike.
As you walk, especially on hotter days, your feet can swell. Swollen feet can cause discomfort and pressure points during a hike. To alleviate this issue, loosen them gradually, starting at the top of the foot and continuing downward and then re-lace the boots, but this time, do not pull them as tight. This will relieve pressure and allow your feet to swell without causing excessive discomfort.
If you experience discomfort in your hiking boot, stop immediately and investigate why before the pain/hot spots increase and blisters form.
As you venture into different terrains, you may find that adjusting the lacing in your hiking boots can make a difference in your comfort and performance; whether you're climbing a steep, long hill or navigating a tricky descent, terrain-specific lacing adjustments can help you maintain stability, support, and comfort throughout your hike.
I generally don't bother adjusting laces if the ups and downs are relatively short. Still, if the ascents and descents are pretty long, you may find it worth experimenting with different lacing methods to keep those feet comfortable and stable in your boots.
To lace for uphill walking, start by lacing your boots in the traditional manner, then secure the knot at a lower point around the ankle and then more loosely secure further up your hiking boot. Ensure the laces are snug enough to offer support yet not so tight that they impede mobility. This allows extra room for your feet to move when climbing uphill and helps reduce the risk of blisters and other foot-related issues.
Downhill boot lacing involves tightening the laces towards the top of the boot and loosening them at the ankle. This helps lock in the knot's tension, optimising the boot's fit for downhill hiking. The heel-lock lacing technique also helps on downhills to stop your foot from sliding forward.
By adjusting your boot lacing for downhill terrain, you can confidently tackle steep descents with greater stability and comfort.
With uphill and downhill boot lacing techniques, practice first on smaller ups and downs to see whether it suits your walking style.
Once you have a lacing pattern that suits your feet and boot, you need to tie the laces. Tying off a lace might seem mundane, but it's crucial to ensure comfort and foot security during any walk. Before you tie the knot, you may want to employ the surgeon's knot for additional security.
The most common method of tying off the laces involves the standard bow knot, a quick and easy way to secure the lace tightly. Again, use double knots, double bow knots, or square knots for added security and reduced slippage. You can also use a granny knot, which isn't usually as secure as a square knot.
Proper care and maintenance of your boot laces help with their longevity and performance.
In the past, I often replaced laces in new boots as many I felt were unsuitable, and knots quickly worked their way free. They have improved greatly over the years and now rarely have to do that.
Laces stretch over time and weaken, and as some of the techniques above put additional strain on the boot laces, it's worth changing them for a new pair before you start trying these techniques or having a spare pair handy in case they break.
Laces weigh next to nothing, so have an extra pair in your first aid kit, where they could also be handy for tying things up.
When replacing your laces, select a pair of the same shape and length as the previous ones to ensure they fit your boots or shoes.
To properly clean and maintain your boot laces from your hiking boot, it's recommended to wash them in warm water. For coloured laces, avoid using bleach to prevent discolouration.
Allow the laces to air-dry, either inside or outdoors.
In summary, the art of lacing your hiking boots is more than a mere detail - it can be a game-changer for your entire hiking experience.
By mastering essential lacing techniques and tailoring your approach to your foot shape and trail conditions, you transform your boots into a personalised haven of comfort and support for your walk ahead. So lace up and happy walking!
December 2023