By using this website, you agree to our use of cookies (needed to provide our website’s features) and our Terms of Use.
By: Andrew Forrest - October 2026
Learn how to walk on ice with practical advice on footwear, ice grips, black ice and safer routes, plus research into winter falls and what to do if you fall.
This page contains affiliate links. As an Amazon Associate, we earn from qualifying Amazon purchases at no additional cost to you. We may also earn commissions from other retailers, again at no additional cost to you.
A frozen path can change in a few strides. The gritty section outside your door may give way to polished snow at the corner, a shaded patch of ice, or a slippery shop entrance. Preparing for those changes is as important as choosing what to wear on your feet.
To reduce your risk of slipping on ice, choose a clearer route where possible, wear secure footwear, and use correctly fitted ice grips suited to the surface. Slow down before slippery patches, take short, deliberate steps, and keep your hands free. Remove unsuitable grips before walking on smooth indoor floors or driving. If you cannot keep your footing, delay the walk or turn back. No footwear or technique guarantees you will not fall.[1] [2]
This guide covers icy pavements, paths and manageable country walks. Steep winter mountain terrain requires different equipment and skills. It does not cover walking on frozen lakes, ponds, or rivers, which you should always avoid.[3] [4]
Black ice is a thin, transparent layer that leaves the ground visible. It may look like wet paving rather than the white ice you expect. The Met Office also explains that the ground can freeze even when the air above it remains warmer, so an above-zero reading on your phone does not guarantee a clear path.[5]
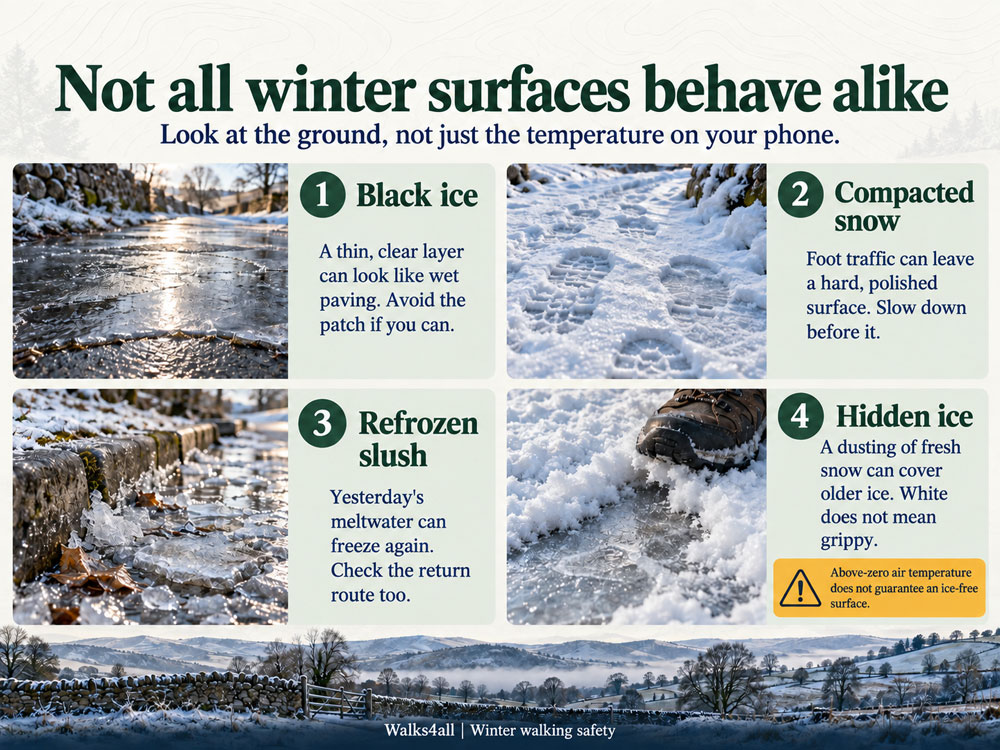
Black ice, packed snow and refrozen meltwater need different judgements; air temperature alone cannot confirm that a path is ice-free.
Look ahead for changes in sheen, texture, and moisture, but don't rely on spotting every icy patch by sight. Check the local forecast and warnings alongside what you can see outside. A wet-looking pavement after a cold night warrants caution, especially where the route has not been treated.
Repeated footsteps can compress snow into a much harder surface. Water from a thaw can refreeze later, leaving a different journey home from the one you took earlier. Fresh snow can also conceal older ice. Do not assume that following another person's footprints means the ground is secure.[6]
When conditions are uncertain, choose a shorter route with easy exits. Avoid turning a brief patch of ice into a longer problem by stepping onto an unknown verge, into the road, or towards an unprotected drop.
Your own step or driveway may be the first awkward part of the trip. Clear snow when it is easier to remove, and use suitable salt or grit according to local advice. The Met Office advises against pouring water onto snow, as it can freeze into a slippery layer. Take care around plants and ensure the cleared snow does not obstruct anyone else.[7]
A treated route still needs checking. Do not assume that every pavement has been gritted because the adjoining road has, or that a cleared stretch means the whole route is clear.
The often-repeated advice to 'walk like a penguin' means slowing down and keeping movements small. NHS winter advice recommends short, slow steps, softly bent knees and placing feet more flatly. It is a practical reminder for slippery ground, not a guarantee against falling.[1]
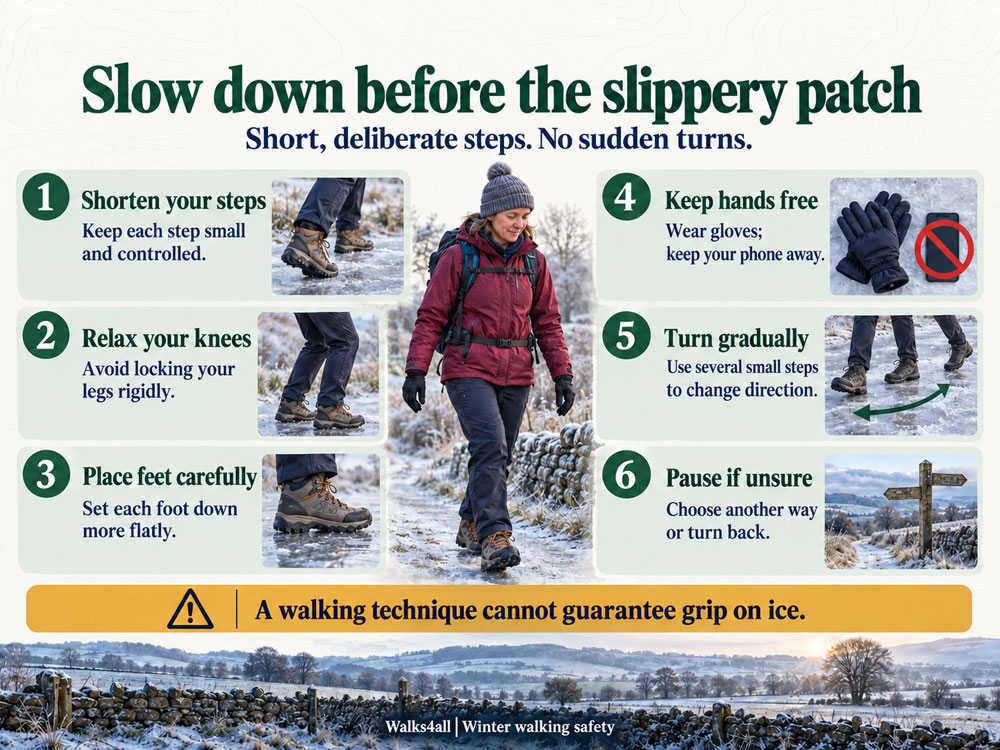
Small, deliberate steps and hands-free balance can help on slippery ground, but they do not make an icy route safe.
Reduce your pace before the slippery section. Keep your body balanced over the supporting foot rather than reaching out with a long stride. Take several small steps to turn instead of twisting abruptly on one planted foot. Avoid sudden changes of pace.
Wear gloves so you can keep your hands out of your pockets. Put your phone away while moving, and stop somewhere secure to read a message or check the route. A manageable rucksack can leave your hands freer than shopping bags, but keep the load comfortable and your view of the ground clear.[8]
Pause before stepping off a kerb or onto outdoor stairs. Use a secure handrail where available, and check the surface you are about to step onto. If the steps are icy and there is no feasible alternative, waiting or asking for help is preferable to committing yourself halfway down.
At the car, look at the ground beside the door before transferring your weight onto it. Take your time getting out, then deal with bags once you are stable. The same applies when you return tired or are carrying shopping.
On a slope, consider where a slip would take you. A short slide towards traffic, water or an edge can have serious consequences. Small steps cannot compensate for a route beyond your equipment or skills.[3]
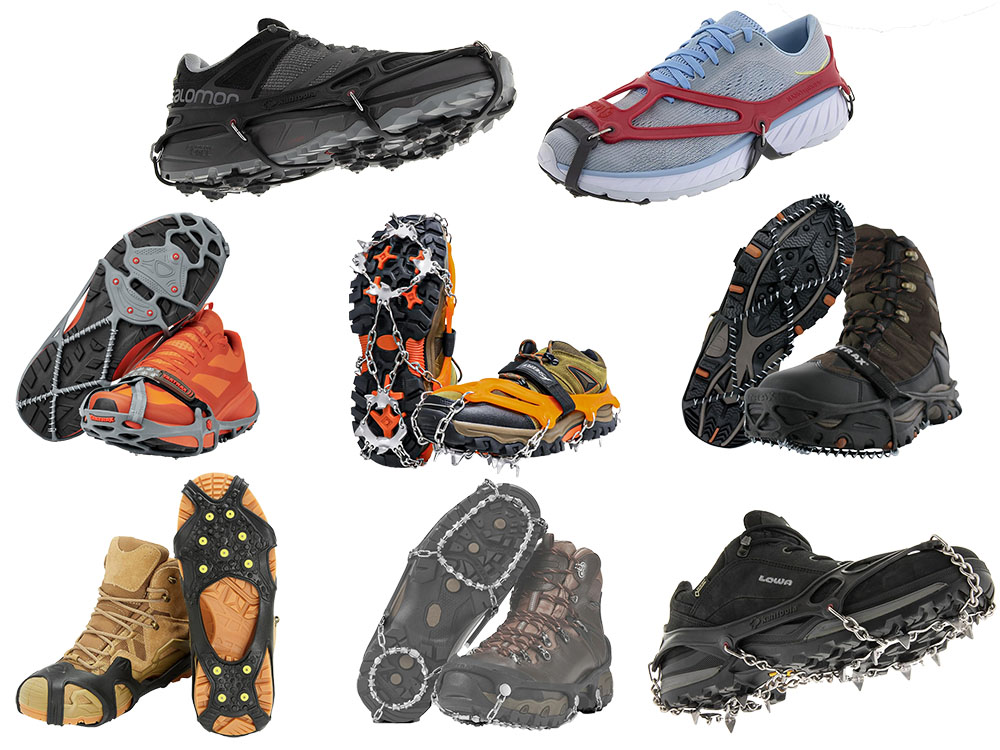
Start with shoes or boots that secure your feet and have soles in good condition. Ice grips, also called ice cleats or traction aids, are attachments that add gripping elements beneath your footwear. Their design matters: a flexible rubber carrier may hold tiny studs, wire coils or short-spiked chains.[2] [3]
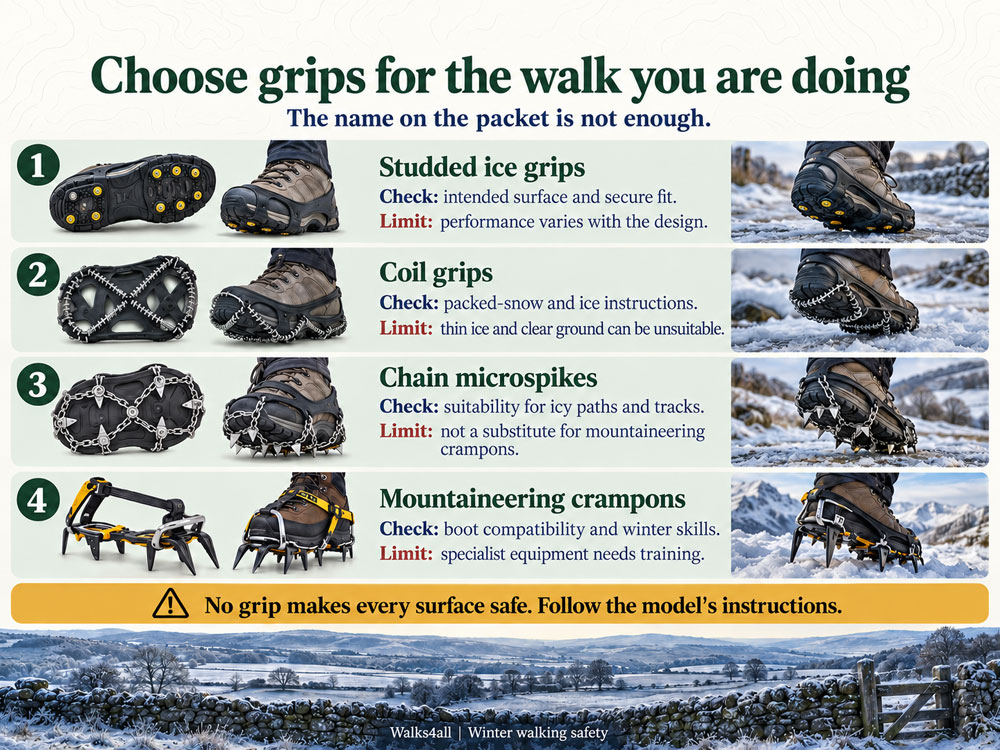
Ice grips and microspikes vary in design and intended use. Mountaineering crampons require appropriate footwear and skills.
Microspikes usually refer to the chain-and-short-spike type used on suitable icy paths and compacted snow. Mountaineering crampons are more substantial with longer points, and require compatible footwear and the skills to use them. Product names are inconsistent, so read the intended use rather than relying on the word 'crampon' in a listing.[3]
| Option | What to check | Main limitation |
| Winter shoes or boots | Secure fit, sole condition and any ice-specific performance information | Deep tread and waterproofing do not establish reliable grip on smooth ice |
| Studded ice grips | Stud design, coverage, fit and the surfaces specified by the manufacturer | Performance differs between models and conditions |
| Coil grips | Instructions for packed snow and ice, sizing and restrictions on clear ground | Some coil designs are unsuitable for very thin ice or bare hard surfaces |
| Chain microspikes | Secure fit and suitability for the path and snow conditions | Not a replacement for mountaineering crampons on steep or exposed winter terrain |
| Mountaineering crampons | Compatibility with your boots, fitting and winter skills | Specialist equipment that needs training and judgement |
For individual product choices, see our best microspikes and ice grippers guide. This article explains how to choose and use the equipment within its limits.
Some can improve grip, but a very thin layer over hard paving is different from thicker ice or packed snow. Read the instructions for the exact model. Yaktrax's UK guidance, for example, warns that its coil designs need enough ice to engage and have limitations on thin black ice and clear hard surfaces. That is not a universal test result for every brand.[2]
A substantial-looking sole is not proof that a boot will grip ice. Fit, sole material, wear and the specific surface all matter. Waterproofing helps keep water out; it does not guarantee ice grip. If your boots slide on the route ahead, change the plan instead of trusting their appearance.
A grip that moves around the shoe is a reason to stop. Practise fitting and removing your pair at home, and check it on the actual footwear you will wear. Two shoes with the same labelled size can have very different external dimensions.[2]
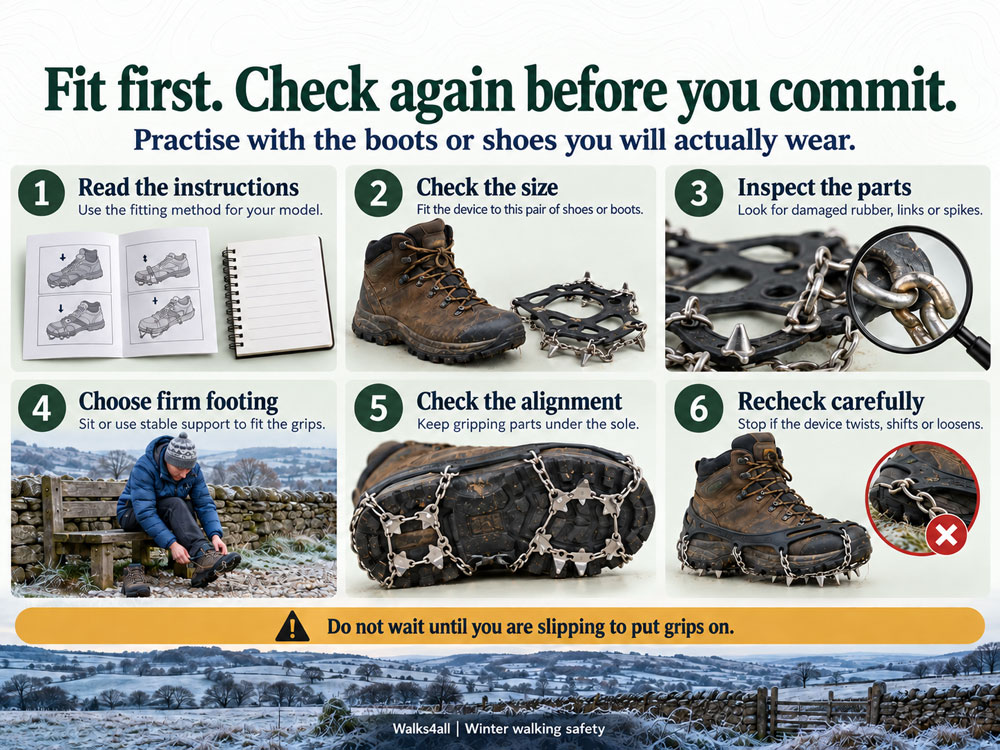
Practice with the footwear you will wear, check for damage and fit the grips from a stable position before entering the slippery section.
Follow the manufacturer's fitting sequence. Check for split rubber, damaged chains, missing parts, and worn gripping elements. Ensure the device is the right way round and that the gripping parts sit under the sole. Fasten any retaining strap as instructed.
Choose firm, level footing and sit or use stable support if needed. Do not balance on one foot on the ice while trying to stretch a tight grip on the other boot. Once fitted, move cautiously on an appropriate surface and check again if anything twists or shifts.
Being able to remove the device matters too. Someone who struggles with the elastic when warm indoors may find it even harder with cold hands. Work out the fitting arrangement before setting off, including whether you'll have help or a seat available.
Before leaving, identify where the surface will change and where you can stop securely to adjust your grips. A trip might include an icy path, clear pavement, stone steps, a tiled shop and a car. Buying something for the icy part is only one part of that journey.
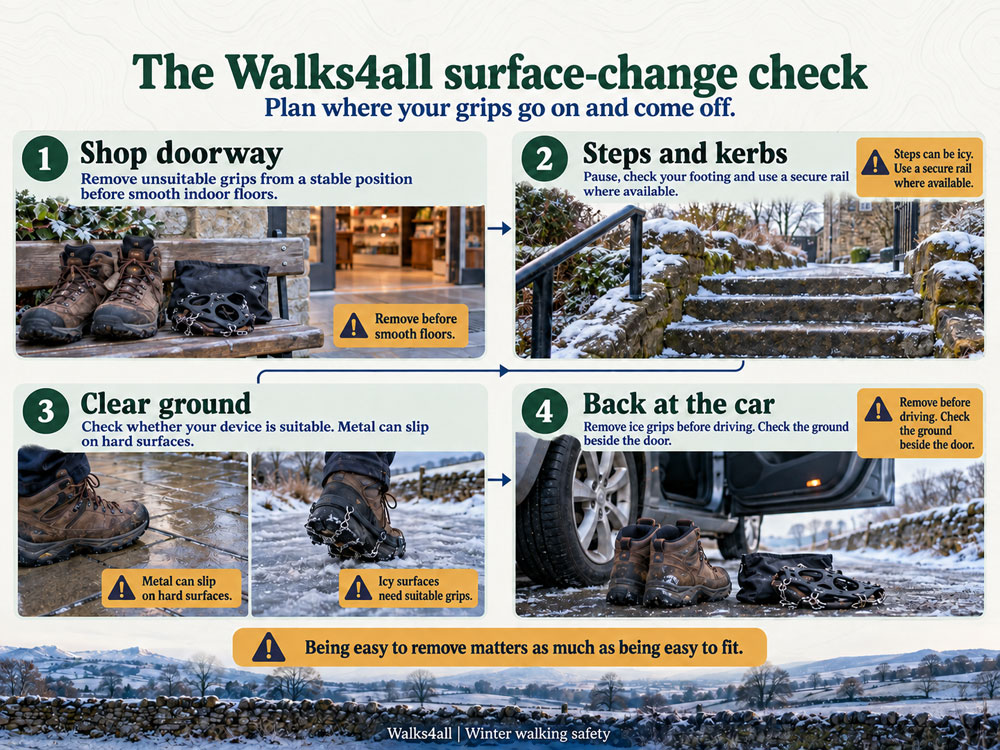
Plan where grips go on and come off, especially at shop entrances, steps, car parks and stretches of clear ground.
Use four questions: what is under my feet now; what comes next; is my equipment suitable for it; and where can I safely change it? This is a practical planning check, not a tested falls-prevention programme.
Remove outdoor grips that are unsuitable for indoor use before walking on smooth floors. Find a stable place to do so, such as a suitable seat near the entrance, without blocking other people. Follow instructions for any retractable system. Do not assume that metal gripping parts remain helpful once you leave the ice.[2]
Reassess when ice gives way to bare stone, paving or other hard surfaces. Some devices can become slippery, uncomfortable or damaged on surfaces outside their intended use. Plan for removal rather than repeatedly improvising in awkward spots. Remove ice grips before driving.[2]]
For a walk involving a café or shops, check how you will make these changes before you leave. Carry a pouch to hold the wet grips. Afterwards, inspect and dry them according to their care instructions so you don't discover any damage halfway through the next walk.
Research suggests that ice grips can reduce winter falls, particularly among older people, but the evidence is more limited than many product claims imply. Studies of a single device, community giveaway schemes and injury records address different questions. None establishes that a particular pair makes every icy walk safe.[9] [10] [11]
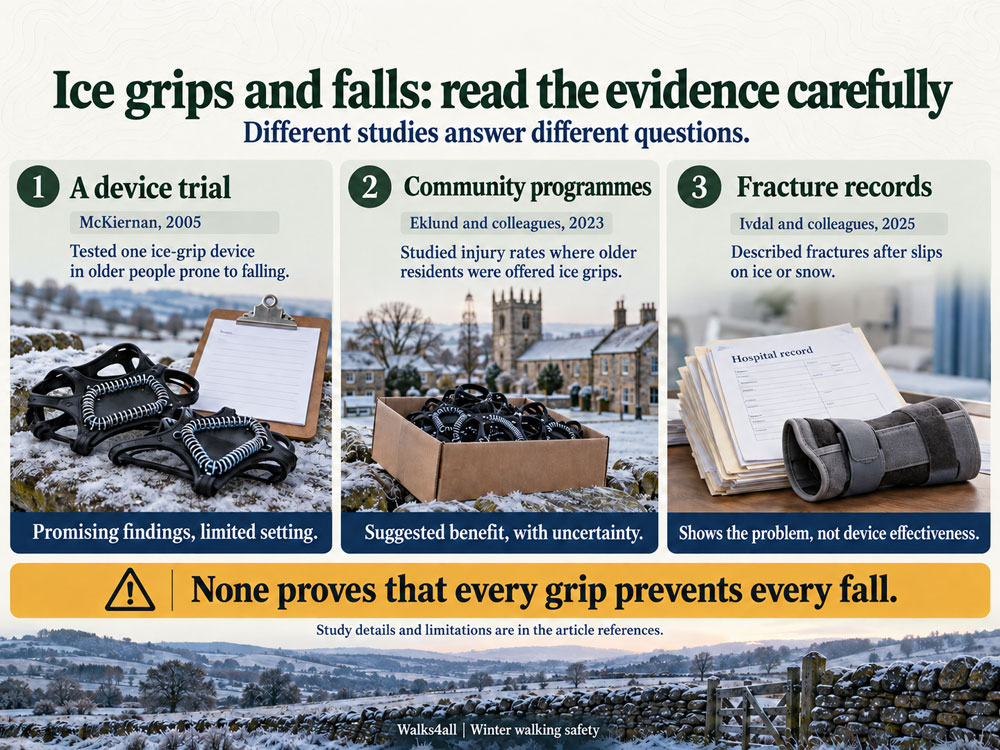
Research supports a possible role for ice grips in reducing winter falls, but studies do not establish that every device prevents injury in every setting.
| Research | Finding relevant to walking | What it cannot establish |
| McKiernan, 2005: a randomised trial, with participants allocated by chance; 109 older people completed it | The Yaktrax Walker group had a lower outdoor-fall risk on days spent walking on snow and ice than the usual-footwear group | Whether other designs work as well, or whether they prevent serious injury; neither group sustained a serious injury or fracture |
| Eklund and colleagues, 2023: comparison of 73 Swedish municipalities offering ice grips with 200 comparison municipalities | The estimated injury rate was lower after distribution; results were more favourable where more grips were distributed | A certain overall benefit: the range of statistical uncertainty around the average estimate included no effect; allocation was not random |
| Ivdal and colleagues, 2025: Swedish register analysis of 50,500 fractures following slips on ice or snow | Wrist and ankle fractures were the most frequently recorded types | Whether ice grips would have prevented these injuries; it was a study of fractures, not a device trial |
The first trial involved older people already prone to falls. The community study examined the effect of providing grips, which also depends on whether people collect and use them. Neither study is a trial of recreational hill walkers crossing steep, frozen slopes.[9] [10]
The sensible conclusion is that suitable grips can be a useful part of risk reduction. Fit, use, route choice and the person's ability still matter. A percentage from a study should not be presented as your personal protection level or applied to a different product.
Assess the return journey while you still have choices. Consider the descent you will face when tired, a shaded section that may remain frozen, and whether a slow pace will push the return into darkness. Leave room to shorten the walk without resorting to an unfamiliar shortcut.
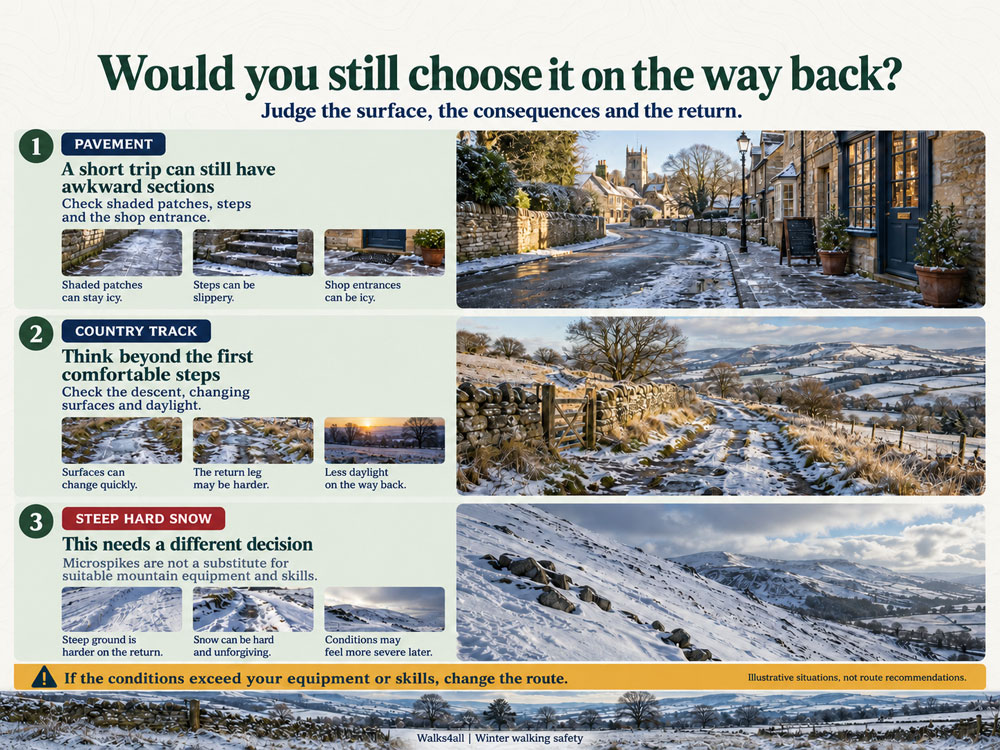
Assess the surface, the consequences of slipping, and the conditions expected on the way back before committing to a winter route.
For a local pavement walk, a longer treated route may be more manageable than a short untreated cut-through. For a country track, check the whole route, including slopes, access points and places to stop. For steep, hard snow or exposed winter ground, seek appropriate winter-skills advice and use suitable equipment. No single slope angle guarantees that microspikes are safe.[3]
If the conditions underfoot are getting worse, someone is struggling, or you are losing daylight, change the plan before reaching the difficult section. Our hiking safety tips cover the wider route, weather and emergency checks.
Poles may offer additional support, but their tips can slip. They do not replace suitable footwear or turn an icy, unsuitable slope into a safe route. If you already use poles, consult the manufacturer's advice on tips and conditions. Our guides to walking poles, balance and descents summarise the wider evidence.
Choose a route where you can manage the dog without it pulling you across ice. Shorten a walk when footing is poor. Avoid frozen water, and never step onto it to follow a pet.[4]
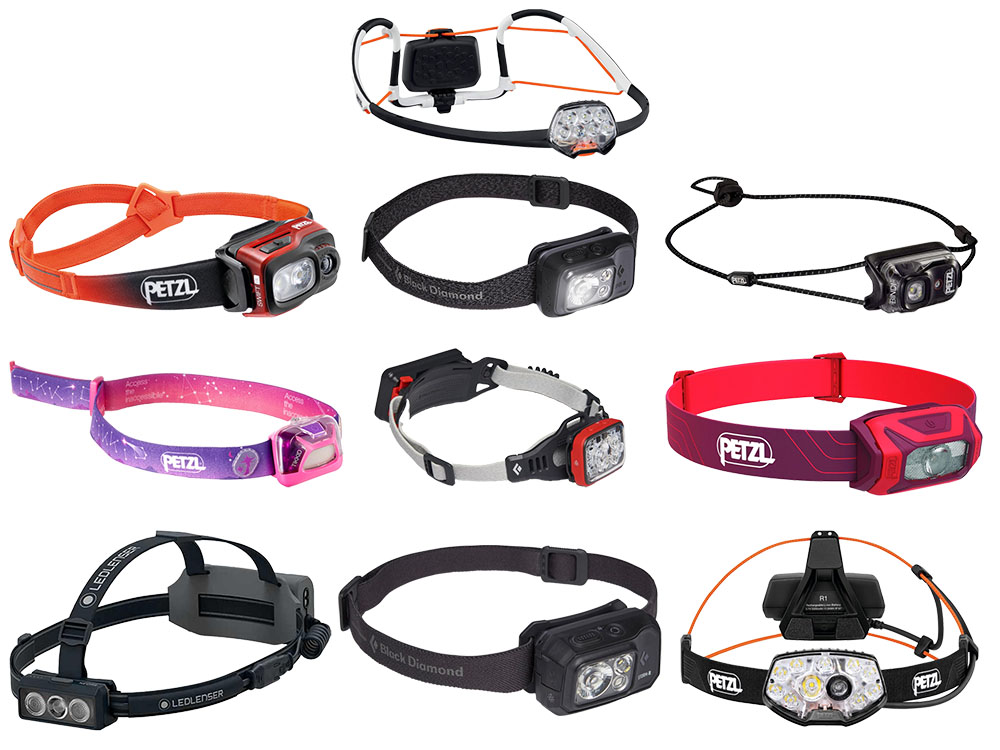
In darkness, use a head torch so your hands stay free, and allow for patches that are hard to see even when lit. Check power before leaving and carry a backup for country walks. See our best head torches guide for suitable options.
Grips do not address all the reasons for a fall. If you have fallen, feel unsteady, or are losing confidence, ask your GP or falls service for advice. The National Institute for Health and Care Excellence (NICE) recommends assessment and support tailored to the person's risks, including suitable strength and balance exercises.[12]
A 2019 Cochrane review, which brings together health research, examined 108 trials involving 23,407 older people living in the community. Its main analysis found that exercise programmes reduced the rate of falls by about 23%. This concerned falls in general, not specifically falls on ice. Evidence was strongest for programmes involving balance and everyday movement tasks; walking alone should not be assumed to provide the same effect.[13]
If you use a stick, frame or other prescribed walking aid, ask a physiotherapist or occupational therapist about winter use and any compatible attachments. Practise changing equipment in a safe place. You do not need to prove you can manage an icy route to stay active: choose a clear route or an indoor alternative when conditions are poor.
Pause and check for pain or injury before attempting to stand. Call 999 if you cannot get up, or if you or the person who fell may have injured the head, back, neck or hip. Keep the person warm and follow the call handler's instructions. Do not pull someone up by the arms or try to lift them yourself.[14]
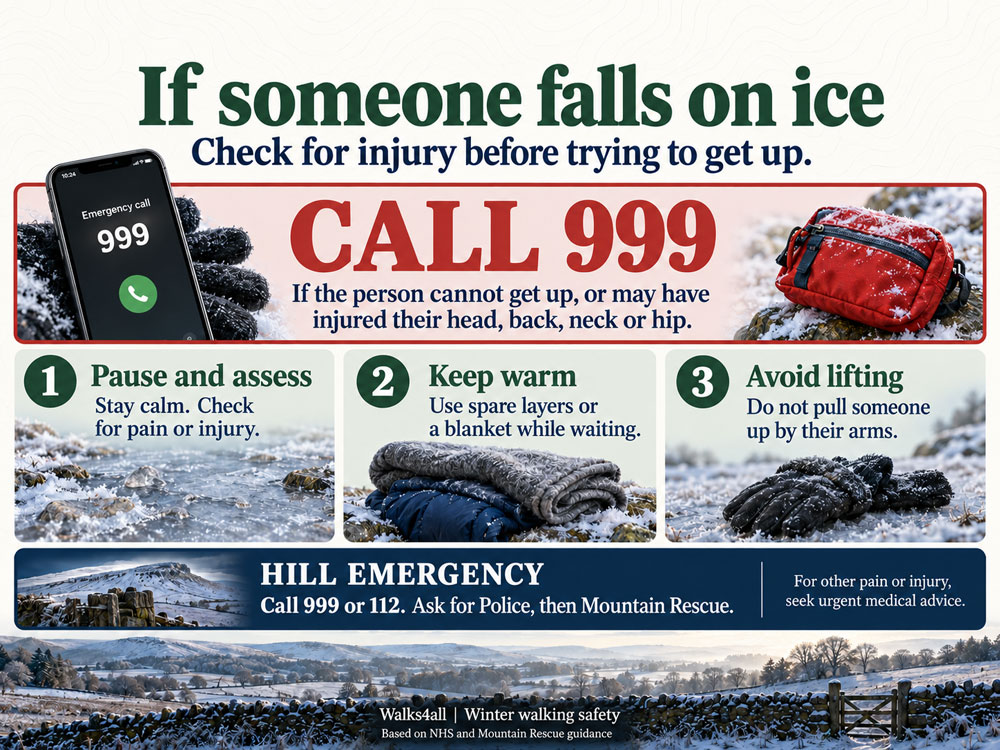
After a fall, check for injury before trying to get up. Call 999 if the person cannot get up or may have injured their head, back, neck or hip.
For other pain, injury, or feeling unwell after a fall, seek urgent medical advice, including NHS 111 where available. If you are unhurt and able to rise, do so slowly, with stable support, and move away from further danger.[14]
In a hill emergency, call 999 or 112 and ask for Police, then Mountain Rescue. Give your location, what happened and the number of people with you. A grid reference, the map coordinates that identify your position, helps if you have one.[15]
Use this before leaving, then reconsider it when you see the actual conditions. For a country walk, tell someone your route and expected return time. Keep your phone accessible and allow for delays.
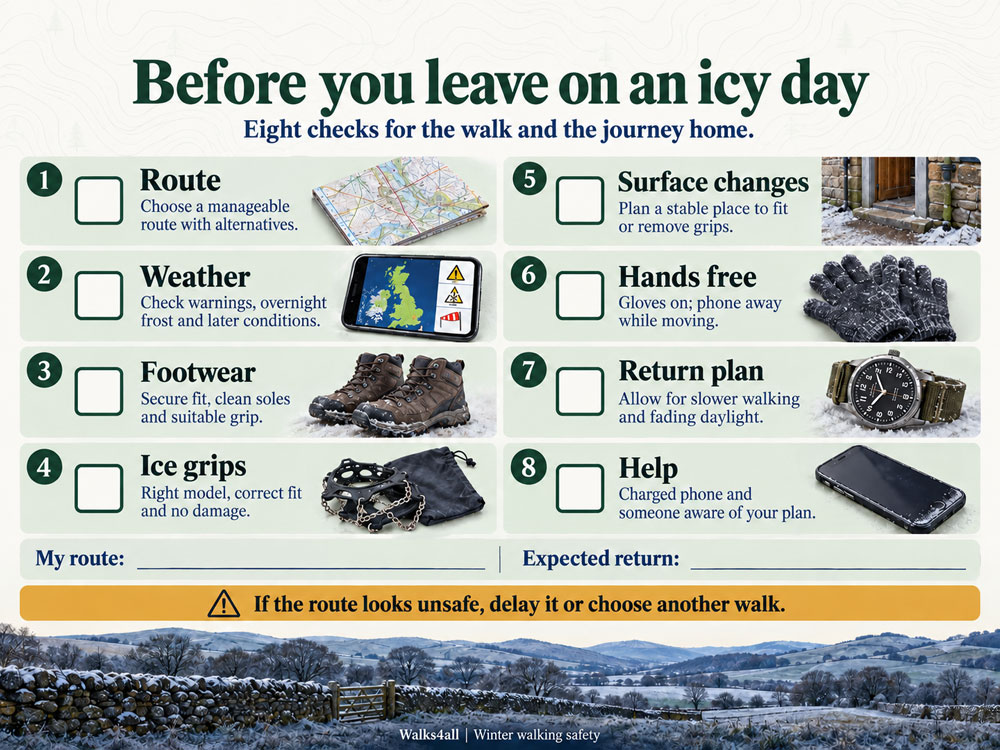
Use this checklist to review the route, footwear, grip fit, changing surfaces and the return plan before setting off.
Choose your icy-day walk with the return journey in mind. Suitable grips can help, but they need to fit, suit the surface and be removed when they are no longer appropriate. Give yourself time to notice changes underfoot and act before a difficult patch leaves you with fewer options.
If you are deciding what to buy, use our microspikes and ice grippers guide alongside the manufacturer's instructions. For everyday use, ease of fitting and removal deserves as much attention as the gripping elements themselves.
Avoid the ice when a clear route is available. If you need to cross a slippery section, slow down, take short, deliberate steps, and wear appropriate footwear and grips. Stop if you cannot maintain your footing. No technique completely eliminates risk.
It reminds you to take small steps, keep your knees relaxed, and avoid overreaching. It may help you move more carefully, but it cannot guarantee a secure grip or make unsuitable terrain safe. It is not evidence that you should attempt every icy patch.[1]
It depends on the model and the surface. Snow-covered or icy pavements differ from clear pavements, tiles and smooth stone. Check the manufacturer's instructions and plan where to remove the device. Do not assume that all products sold as microspikes have the same intended use.
Sometimes fresh snow offers a different surface from polished ice, but it can conceal ice and other hazards. Compacted or refrozen snow may be very slippery. Judge the route ahead of you rather than choosing by colour alone.[6]
Outdoor metal grips may be unsuitable for smooth indoor floors. Remove them or use the manufacturer's specified retraction method before entering, from a stable position. Plan this in advance if you cannot easily reach your feet or operate the fitting mechanism.[2]
Consider delaying, arranging help, or choosing a cleared route. Secure footwear, a slower pace, and handrails may help, but none substitutes for the grip needed on the surface. Do not rely on an improvised shoe modification to make an unsafe route manageable.
No blanket rule is helpful. Choose conditions and routes you can manage, and seek advice if balance or a history of falls is a concern. On an icy day, changing the time, route or activity can help you stay active without forcing an outing in unsuitable conditions.
October 2026